Say goodbye to those store-bought decorations and start making customized, handmade clay ornaments! There’s just something beautifully sentimental about creating your own ornaments. Not only does it set your Christmas tree apart from the rest, it also adds a sprinkle of personality to your holiday decor. So, let’s start creating!
Materials Needed for clay ornaments:
- Polymer clay
- Acrylic Paint
- Paintbrush
- Rubber stamps
- String/ribbon
- Cookie Cutters
- Rolling pin for clay (you can use a marker that has straight sides too)
- Baking sheet
- Parchment paper (to prepare the ornament and bake)
- Paper Towels
- Cup of water
Making Your Own Clay Ornaments: Step-by-Step
Step 1:
Condition the clay, to get is soft so that it’s easier to work with. Roll the clay into a ball, using the rolling pin roll the clay into a disc that is 1/4″ thick.
Step 2:
Use the cookie cutters of your choice and cut out the shapes for your clay ornaments. Mine were about 2″ in diameter for the circles. Use the back of the paintbrush to create a hole at the top of the ornament to loop the ribbon/string through later.
Step 3:
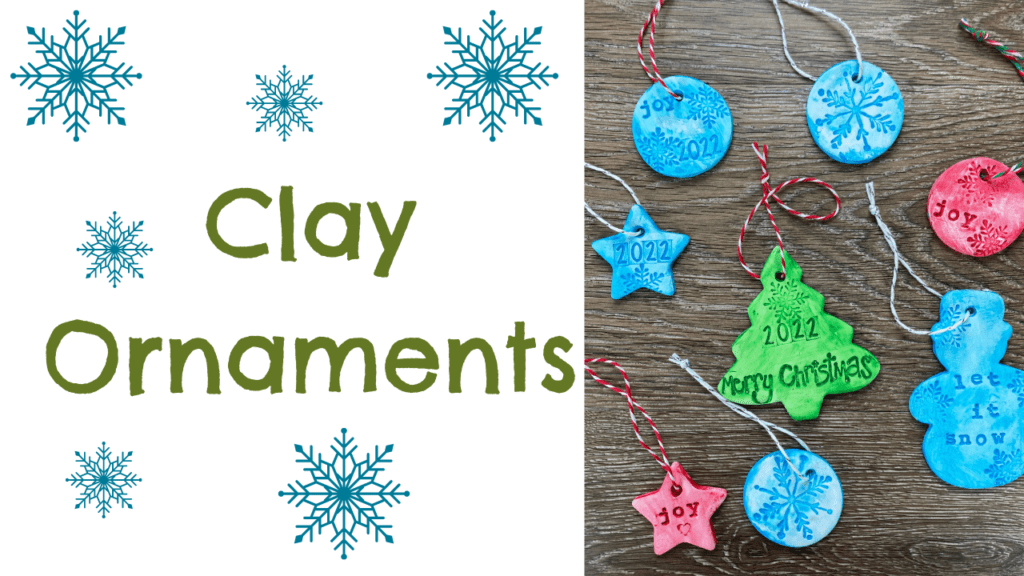
Now that you’ve laid the groundwork, you can put a personal touch to your clay ornaments. You could press your family’s fingerprints into the clay, or carve initials and dates for a sentimental touch. This step not only adds a personal element but also makes for heartfelt gifts for friends and loved ones. Using your rubber stamp create the designs and words you would like for your ornament. I used snowflake stamps and have individual letters and number stamps to use. I wrote the year, joy, and Merry Christmas, the options are endless.
Step 4:
When you are finished stamping your designs into the clay, place them on a parchment paper-lined baking sheet and bake your ornaments according to the clay package instructions. Mine was 15 minutes in a 275-degree oven for every 1/4″ thickness. Let them cool completely after taking them out of the oven. Be sure to get help when using the oven.
Step 5:
When your ornaments are cooled completely you can start to paint them. I coat them completely and then wipe off the excess so the designs I stamped stand out. Once they dry I like to wipe them again with a slightly damp paper towel to finish them and get them how I like them.
Step 6: Finishing Touches
Once they are completely dry and you like them to can cut a small piece of string to loop through the hole and tie a knot at the top to finish. Your ornaments are now complete and ready to adorn the tree!

Nothing beats the satisfaction of creating something with your own two hands. Crafting clay ornaments is not only a fun and festive activity, but it also allows you to add a personal touch to your home decor or gifts. With these simple steps and a little bit of imagination, you’ll have a collection of one-of-a-kind ornaments that will be cherished for years to come.
For more handicrafts to make with your kids check out our Elevation Handmade Kids courses that offer skill-building projects, along with video tutorials and printable supply lists and instructions every step of the way. These courses are beginner-friendly and offer skills that will last your child a lifetime.