
Making these homemade marbled Valentine cards are a great way to show someone you care. Homemade Valentine cards are often more meaningful than store-bought cards, as they show that you took the time and effort to create something special for your loved one.
Making them yourself is a fun and creative way to express your love and is a lot of fun for kids because they can be creative and uniquely express themselves. Kids can choose the colors, and messages that they want to use to make their Valentine cards special.
It’s also a great opportunity to show love and appreciation to friends and family. Homemade valentines are also a great way to teach children about crafting, creativity, and giving. It’s so much fun for kids to receive and give homemade valentines!

supply list for marbled Valentine cards:
- Cardstock (for the card)
- White Cardstock or White Paper
- Shaving Cream (creamy)
- Ruler or something flat to scrape off the excess shaving cream
- Paper plate or tray for shaving cream
- Food Coloring
- Scissors
- toothpick/skewer
- Area to scrape off the shaving cream, trashbag, or outside somewhere that you can get messy. (I used paper towels underneath as I scraped the excess)
- Glue stick or school glue


step-by-step instructions to make a marbled valentine card:
1. Fill your tray/paper plate with shaving cream in a flat layer.

2. Add drops of food coloring of your choice on top of the shaving cream layer.
3. Using your toothpick/skewer swirl the food coloring until you like the way it looks. 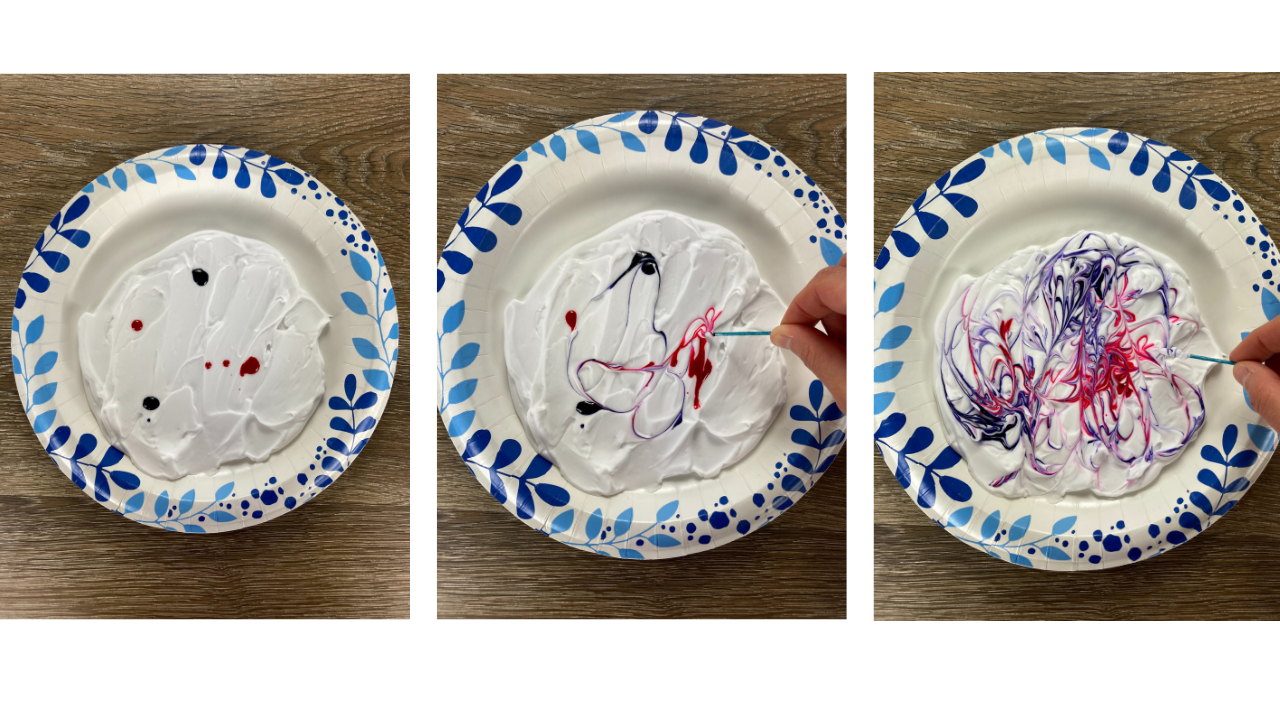 4. Lay your white paper/cardstock on top of the shaving cream/food coloring mixture and press lightly making sure all of the paper has touched the shaving cream. Peel the paper off slowly.

5. Use the ruler to scrap off all of the excess shaving cream mixture when it is still wet. Once the shaving cream is scraped off let the paper dry completely.

6. Once your new swirly paper is dry cut it into heart shapes, or any other shapes you like.
7. Cut your colored cardstock into a rectangle to create a small card.

8. Glue the heart shape(s) to the card you created and write your Valentine’s message inside.

9. I like to put a “handmade by Chelsie” note on the back of the card near the bottom.

This simple marbling technique can be used in a variety of other ways you could marble a journal cover, cut out different shapes other than hearts and use for different holidays like a tree for Christmas or an Easter egg for Easter. This easy technique can also be used for artwork to be framed to decorate a room. So many fun ideas to try!
If you create marbled Valentine cards I would love to see them! You can tag me on Instagram @elevation_handmade.
Happy Crafting,